

Until about a month ago, I wasn’t a big fan of facial massage tools. Call me lazy, but I dreaded the idea of following up all my skincare products with an extra device. Ever since my anxiety levels skyrocketed during the Circuit Breaker period, though, one surprising thing has helped ease my stress: a gua sha facial massage.
What is gua sha?
To the casual observer, a gua sha massage can look pretty brutal, involving vigorous scraping of the skin all over the body with an angled stone.
However, the latest incarnation of the treatment is a much gentler form that focuses on the face and neck. A gua sha facial massage uses a curved flat tool to lift the skin in upward motions, relaxing muscles and draining fluid in the process.
The benefits of a gua sha facial massage
A gua sha facial massage breaks down tension and increases blood flow, which boosts your overall skin health. Just like a regular massage on other parts of your body, gua sha relieves your facial muscles and puts you in a zen state. Over time, it can smooth out fine lines and increase collagen production — perfect for those who want an alternative to Botox.
If you’ve been knocking back the alcohol to counter self-isolation stress, you may have woken up to a puffier face in the mornings. This is a good time to reach for a gua sha tool. Draining lymph fluid away from your face can help you achieve a slimmer, more contoured visage.
After doing this for a month, 15 minutes of nightly gua sha has replaced a number of skincare products in my routine. There’s no need for a depuffing eye gel, a vitamin C serum, or a chemical exfoliator. My skin has been able to heal quicker, so breakouts don’t overstay their welcome for an extended period of time now.
Sometimes, I would pop my gua sha tool into the fridge or freezer for an added cryo-massage factor, although it still has a cooling effect if used as-is.
What you need to give yourself a gua sha facial massage
A gua sha tool

I’ve been using a black facial gua sha from Wildling, which is made of Bian stone. It has a U-shaped edge that hugs the angles of the jaw, cheekbone, and brow bone. The comb edge has unique ridges to stimulate blood flow on flat surfaces of the face. It also has a shorter, straight edge to sculpt under the eye and around the sinuses.
If you want to try a different material of shape, Herbivore Botanicals’ Gua Sha Rose Quartz and Mount Lai’s Gua Sha Facial Lifting Tool work just as well.
A facial oil

The massage not only gives your skin a workout, but it also helps the nutrients from your products to absorb better. I usually apply a layer of Pai’s Rosehip BioRegenerate Oil on my skin after toner and serum to give the gua sha tool maximum slip. After all, you don’t want the tool to tug on your skin.
Rosehip oil is packed with antioxidants and fatty acids to soothe sensitive, blemish-prone skin. It is also rich in carotenoids to lighten dark spots and acne scars. You can also try the Biossance Squalane + Vitamin C Rose Oil to brighten dull skin. If you’re not fond of facial oils, a thick layer of moisturiser will do the trick.
How to use your gua sha tool
Before you start dragging the edge of a gua sha tool all over your face, make sure you hold the stone flat to your skin at a 15-degree angle. Be gentle with the amount of pressure you use to avoid leaving any harsh marks or redness.
1. Sculpt your jawline with the U-edge
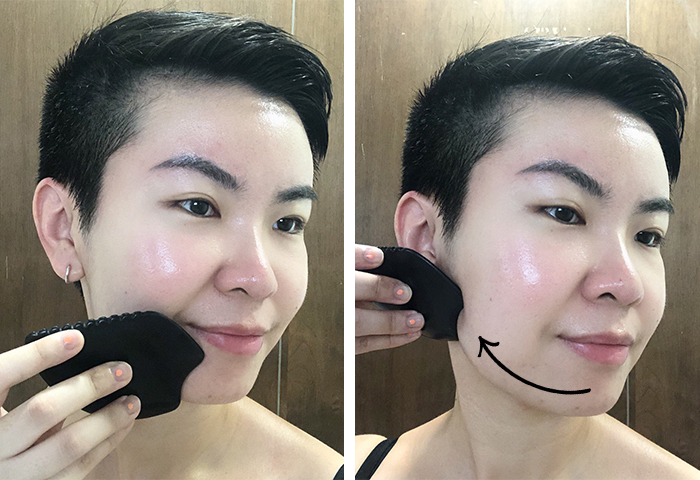
Starting from the middle of your chin, use the U-edge and move the tool slowly along your jawline, up to where your earlobe is. Always go in one direction, never back and forth. You can do this motion between five to ten times, depending on your preference. Repeat this on the other side of your face.
2. Define your cheekbones with the U-edge
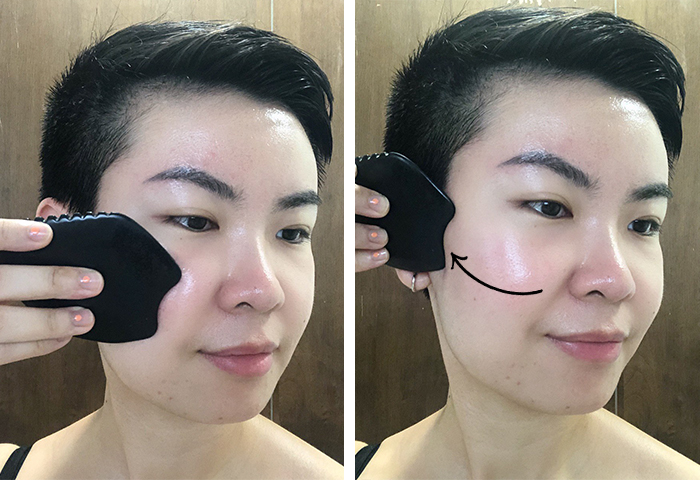
Place the U-edge side of the tool on the apple of your cheek and move it upwards to hug your cheekbone. Repeat this motion between five to ten times and do the same on the other side of your face.
3. Boost circulation with the comb edge

If your gua sha tool has a textured comb edge, use it to stimulate blood flow on large surfaces of your face, such as your cheeks. Repeat this motion between five to ten times on one side of your face and do the same on the other.
4. Depuff undereyes and relieve sinuses with the short edge
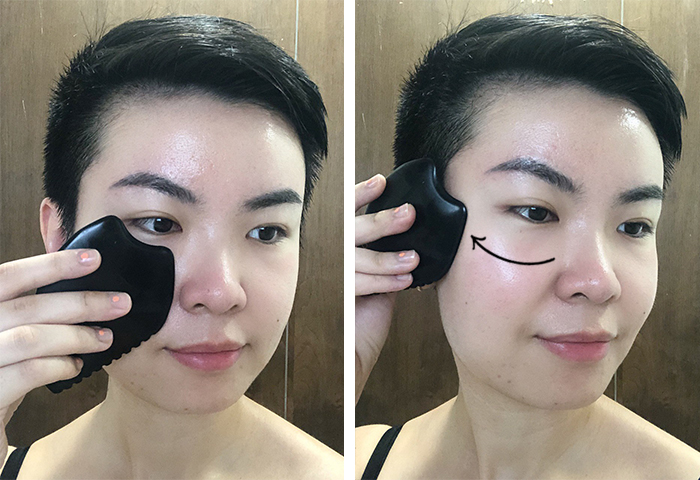
Using the short edge of the tool, place it under your eyes, next to your nose, and move it upwards and out. Repeat the motion between five to ten times and on the other side of your face. With this, I noticed that I’ve been able to breathe better after too. Almost like it has unclogged a blockage in my nose.
5. Contour your brow bone and lift your eyes with the U-edge
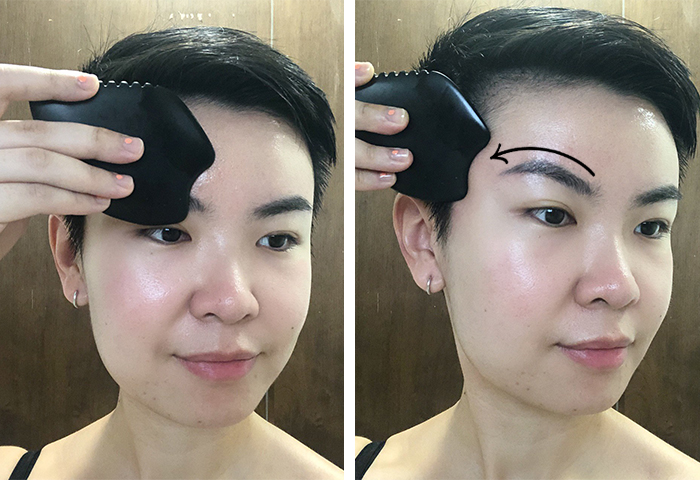
Place the U-edge of the gua sha tool on the front of your eyebrow. Move it across the length of your brow and into the hairline. The gentle pressure from the strokes with lift the skin around your eyes for a more rested appearance. Repeat the motion between five to ten times and do the same on the other eyebrow.
6. Smooth out fine lines on your forehead with the long edge
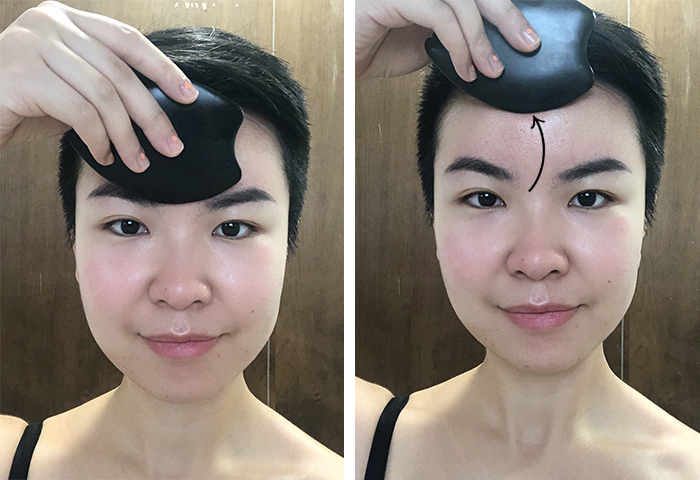
With the long edge, place the gua sha tool between your brows and bring it upwards into your hairline. You can extend it out to the left and right side of your forehead too. Repeat the motion between five to ten times with each direction.
After a gua sha facial massage session

Before (left) and after (right)
As you can see, the quick session made me look less puffy and more awake. My nerves were more settled too, and I was ready to take on the day. If you’ve been overwhelmed with stress lately, you should definitely consider investing in a gua sha tool. We all need a bit of self-care during these trying times.


